Rendering plans in Photoshop is an essential part of presenting your work to your client or to convince a competition jury to pick your design as a winner. Whenever you publish your work for books, websites or presentations the design quality of your plans will be your business card to future clients and the audience you build around your practice. Let’s start step by step.
1. Structuring your CAD drawing in AutoCAD

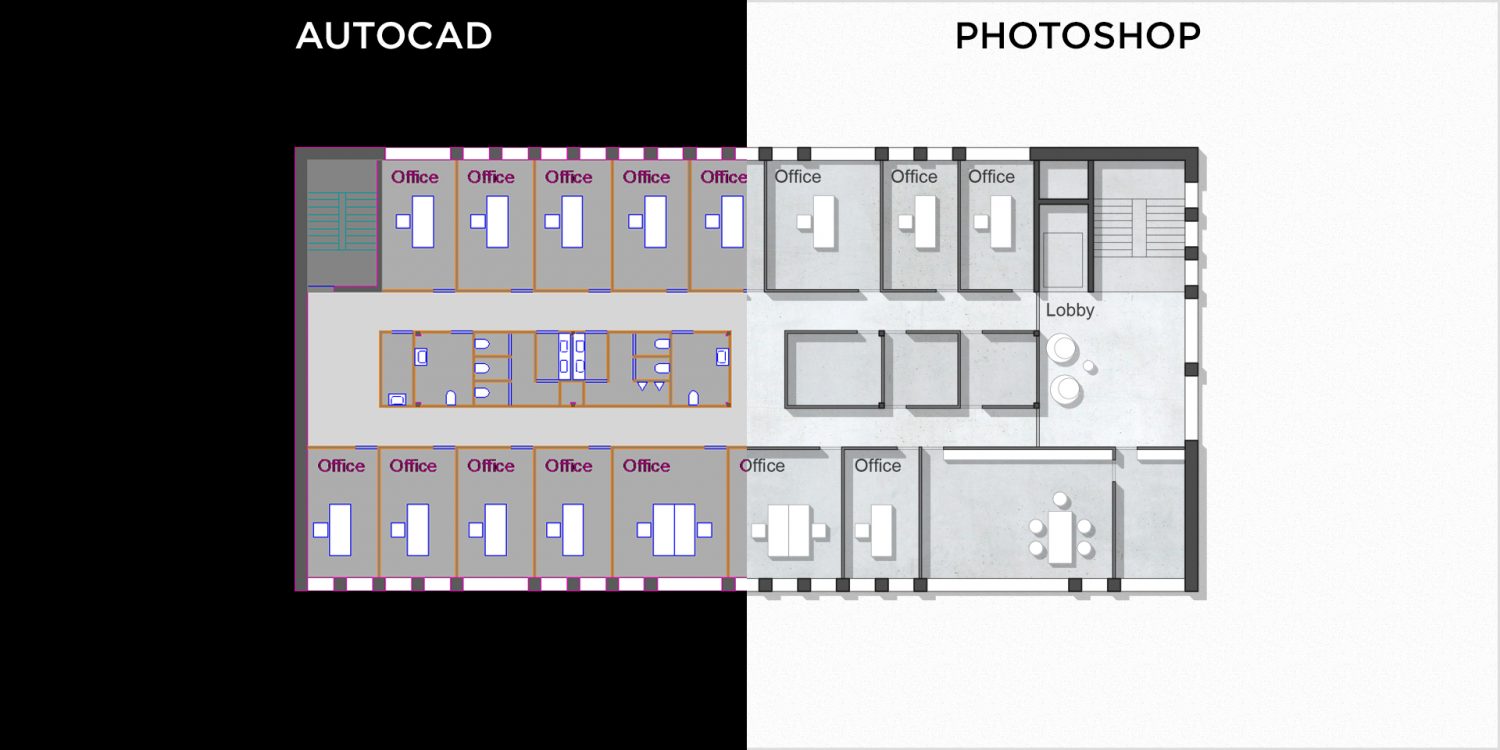
In this article we will cover the principle steps of how to export a floor plan drawing from AutoCAD and render it with Adobe Photoshop. The art is to create aesthetic looking plans that are not too overloaded with colors and textures. In order to speed up your workflow you should already structure your CAD drawing in a way that helps you to be faster in Photoshop later.
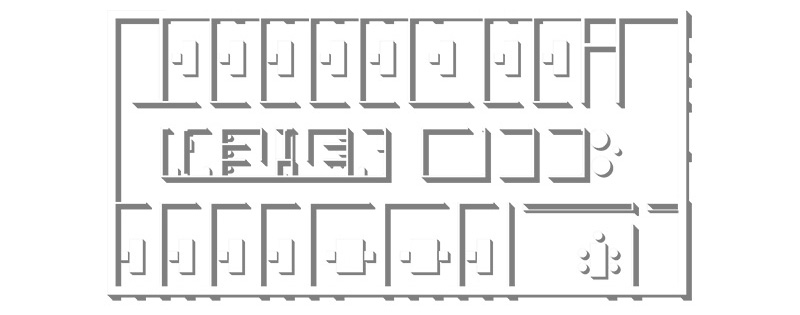
The graphic above shows the principle drawing style of a simple office floor plan in AutoCAD right before exporting. Here are the things you should do in your AutoCAD DWG:
1.1 Structure you drawing on different layers
This is of course not a magical advice but it really critical to do so and to be able to export different parts of you drawing to single PDF files later.
1.2. Use solid hatches to fill parts of your floor plan
As you see in the AutoCAD screen shot graphic above the following parts of the floor plan drawings are filled with solid hatches on unique layers:
- Concrete walls
- Light walls
- Stair cases
- Rooms
- Corridors
- Background hatch
- Anything else you want to have as a unique selection in Photoshop later
1.3. Create a layout window for each element you want to export separately
You should create a layout window with the same fixed size and scale for each part of the drawing you want to export. In the layout frame you show only the layer you want so export. Freeze all others. With the “Publish” function of AutoCAD you could simply export the entire layout windows to PDF files in one steps. The outcome size of your layout windows will be the size of your Photoshop document later. See the graphic below, which shows the different layout windows I created in AutoCAD to export my drawing to single PDF files.

2. Exporting your DWG drawing to PDF files
You have finished you CAD work and structured your drawing the way explained above? Great, now you are ready for the next step:
2.1 Export your drawing to multiple PDF files
Why multiple? Because this is necessary to structure your Photoshop PSD file into the elements you need for rendering your plan. In order to do so you should export single layers of your DWG by freezing all others layers and using the layout window you created for the object. I exported 10 different PDF files for this office floor plan case study. Sounds a lot, but you will safe the time later when it comes to photoshopping.
2.2 Open your PDF Files in Photoshop with 200 dpi
If you open your exported PDF Files with Photoshop you will see a pop up screen that will ask you with how many pixels you want to open the file. I always use 200 dpi because it is enough for high quality printing and keeps the files size manageable. If you have a fast Mac or PC engine and want a really high quality, let’s say for a book publishing, than 300 dpi would be good for you. But there is no need to go higher because your file size will explode and your computer will slow down.
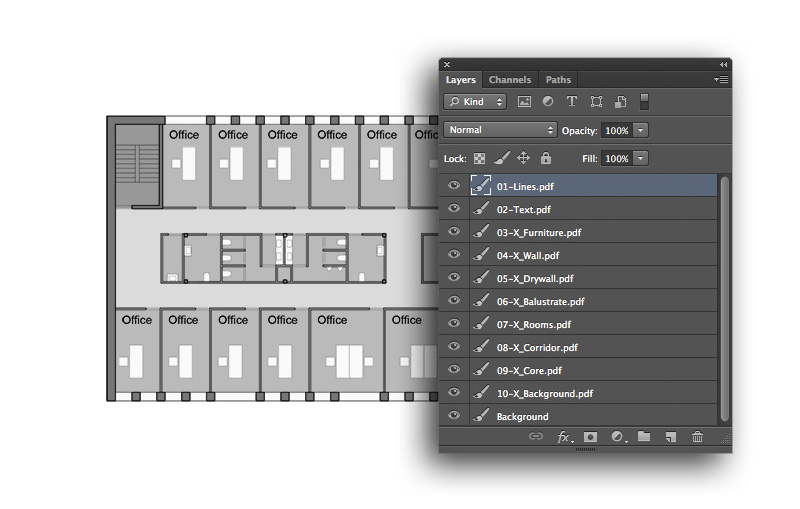
2.3. Layer all PDF files in one PSD file
You have 10 different PDF files opened in Photoshop now. Next step is to layer those files in one file. Since all of the documents have the exact same image size you can simple duplicate layers in into one master file by right clicking on the layer and choosing the file you want to collect all of the elements. I always use the Lines.pdf as my master document. Once finished you should saves that file to a PSD file and close all the others. The following graphic shows how my raw layered PSD file looks like and how I sort the layers in order to get ready for coloring and texturing.
3. Rendering your plan in Photoshop
Now we are coming to the fun part. You have sorted your raw PDF elements in one Photoshop PSD file. This is the point where you are ready to add colors and textures so your plan will look great for publishing.
3.1 Adding textures and colors
There are of course many ways to add colors and textures with Photoshop. But you are prepared to be really fast now. Why? Because you have already all the selections for the separate plan elements like walls, floor or furniture. Let me show you how simply you could add different colors to your floor plan. Go to your layer palette and double click on the hatch layers of the rooms or corridors. The following window will pop up:
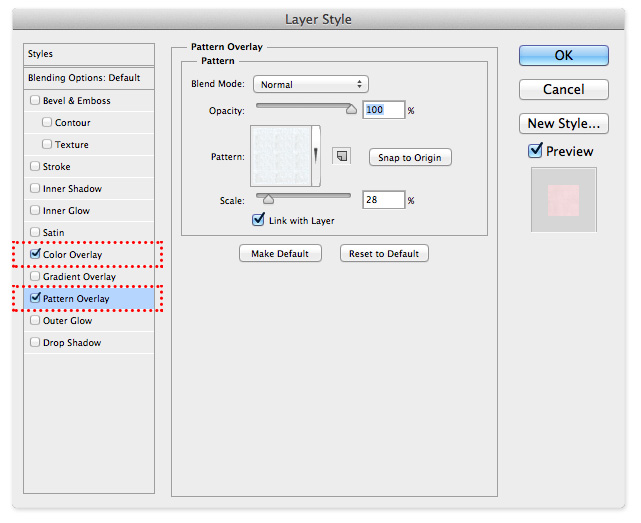
In order to create a subtle and abstract looking surface you can use a concrete pattern and overlay it on your layer. If you want to choose from a wide range of textures just browse to cgtextures.com and you will find everything you need. For the red look I use a color overlay and put the blend mode on “multiply” and the opacity on 30% for the office rooms. The corridors are on 10% opacity. The layers will look like this then:

Here is a list of the layers of the floor plan PSD with the layer settings I use to create the style below:
Lines Layer Layer Setting: Multiply, 75% Opacity
Text Layer Layer Setting: Multiply, 75% Opacity
Furniture Filling Layer Layer Effect > Color overlay: White, RGB 255/255/255
Concrete Wall Filling Layer Layer Effect > Color overlay: Black, RGB 0/0/0, 70% Opacity
Dry Wall Filling Layer Layer Effect > Color overlay: Black, RGB 0/0/0, 50% Opacity
Balustrade Filling Layer Layer Effect > Color overlay: White, RGB 255/255/255
Stair Case Filling Layer Layer Effect > Color overlay: Red, RGB 255/0/0, 30% Opacity Layer Effect > Pattern overlay: Concrete Pattern
Room Filling Layer Layer Effect > Color overlay: Red, RGB 255/0/0, 30% Opacity Layer Effect > Pattern overlay: Concrete Pattern
Corridor Filling Layer Layer Effect > Color overlay: Red, RGB 255/0/0, 10% Opacity Layer Effect > Pattern overlay: Concrete Pattern
Background Filling Layer Just a white filling
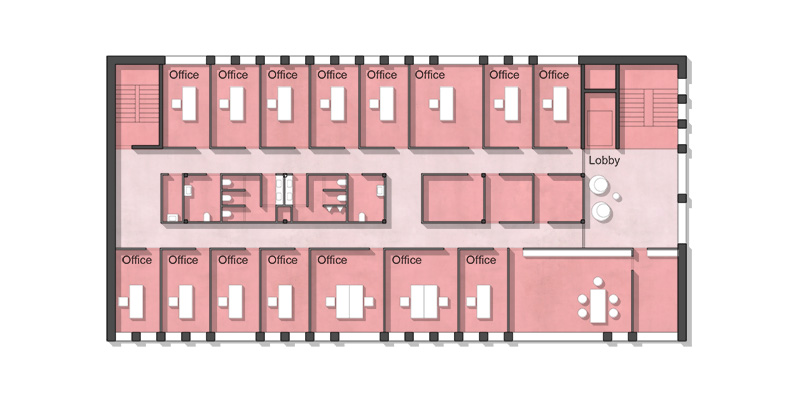
The order of the layers is like you can sort them in your PSD. See the outcome of those easy steps below. This is the final rendered floor plan. The only thing you still have to do is to add shadows!
3.2 Creating shadows for your floor plan
We still have to create the shadows, so the floor plan will look more plastic. Shadows are great to understand the different spaces, heights and depths of the design. I am a huge fan of drawing my shadows already in AutoCAD and exporting them in a single PDF file like the method explained above. You can then easily import them on a layer above all other layers. Fill the shadow hatch with black color, set the layer on multiply and 15-25% Opacity. And you are ready.
The other way is to create them in Photoshop on a new layer with the rectangular marquee tool (M) and the paint bucket for filling them with black. I like the AutoCAD way more because it is more accurate and faster for me but this would depend on your skills of course.
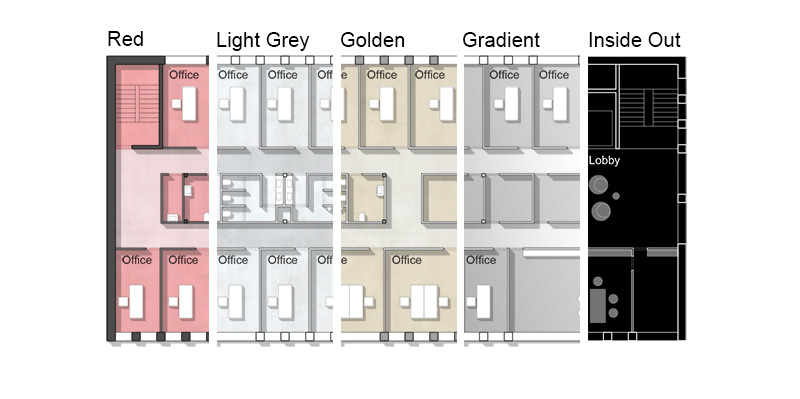
3.3 Choose the graphical style you want
Once you are done with the steps described above you have created a PSD file with which you could easily play around to change the output styles of your floor plan graphic. By just chancing the layer effects I created the following design styles shown in the graphic below. You might want to do the same in case you don´t like the red style.
Last thoughts and conclusion
I hope that the described step-by-step process was helpful for you. Of course this requires a certain skill set of AutoCAD and Photoshop. But even if you are just a beginner the powerful knowledge is the how to of the steps. I will cover details in later articles to examine single steps of the render process. You probably want to know about Sections and Elevations too! It’s on my list. If this article was helpful for you please subscribe to my newsletter and get more information on Photoshop Tip and Tricks for Architects and Designers. And of course comment this article below to share your knowledge. I am looking forward to your feedback!

